Monday, November 19, 2012
Tuesday, November 13, 2012
RENAME YOUR RECYCLE BIN
RENAME YOUR RECYCLE BIN
 Ever wanted to change it..?
With the help of this trick you can rename your recycle bin.
Just follow the steps given below:
Don't You feel Bore with the same old name of Recycle Bin..?
Step 1. Go to Start > Run
Step 2. Type in regedit this will open Registry Editor.
Step 3. Go to HKEY_CLASSES_ROOT/CLSID/{645FF040-5081-101B-9F08-00AA002F954E}.
Step 4. Change "Recycle Bin" to whatever you want.
( You can change it to any interesting name like my pc trash, dump zone, the wastebox or any other funny one.)
Blank Comment in Facebook!!!
How to add a Blank Comment in Facebook!!!
Hey Guys! In This Post I am Going to tell you how to post a blank Facebook status or How to Post an Empty Status on Facebook Wall.
It works only With both Status and Comments.
So here is the trick..
1) Goto Your Profile and type
2) Type either “@[0:0: ]” or “alt+0173? (of numpad without qoutes)
3) Press Enter… And You Are Done..:P
Simple, isn’t it..
Now play around , shock your friends and have fun..;-)
Subscribe to get more trick and hacksBug In Windows Calculator
Windows Hacks: Bug In Windows Calculator
Here is a easy trick to find out a bug in windows calculator.
Step 1: Go to run, type calc and click ok.

Step 2: Then, Type 9, Take Square Root of it.
You should get the answer 3
Step 3: Now, Subtract the answer (which is 3) by 3.
Instead of getting 0 as the answer you get a long number.
Now that's the bug, that's for all nos, For all version of Windows
Ccheck out! and start following for new tricks and hacks
Monday, November 12, 2012
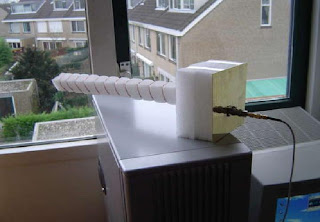
How To Make a 10$ WIFI 16dBi Super Antenna
How To Make a 10$ WIFI 16dBi Super Antenna

- Materials Needed
A 12x12cm brass, copper or tinned metal plate, a BNC chassis connector, a BNC cable connector, 35mm thick PE or styrofoam (can also be thicker) and some 1.5mm2 single core wire. This stuff is used in the Netherlands in 220V in house cabling.
- Other possible materials:

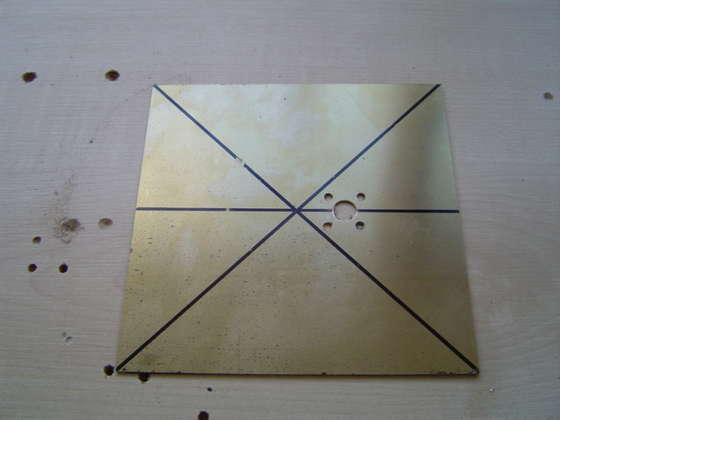
- Mount the BNC connector to the plate
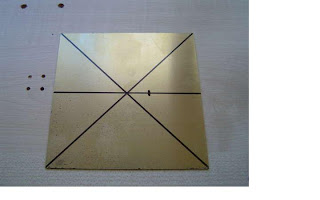
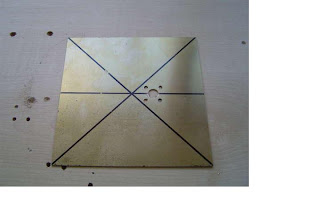
Find the center of the plate by drawing lines between the corners and make a mark 20mm from the center. Drill a hole in the plate at that point that is big enough to fit the center conductor and its isolation. After drilling, you can put the connector in the whole, mark the 4 fixing holes, drill them and mount the connector using small bolts.

- Cut the PE or styrofoam
 We need to cut 3 pieces of PE foam or styrofoam. PE foam is often used to protect computer or measurement or other sensitive equipment during transport it should be easy to get when asking around if you don't have it yourself. Styrofoam is even easier to get, but a little harder to work on. Styrofoam can be bought at DIY stores as a standard isolation material for houses.
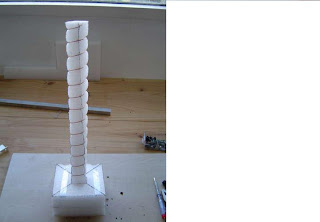
 We need to cut two 12x12 centimeter squares that are 3.5cm thick. A 3.5x3.5cm hole must be made in the middle of the squares. We also need to cut a 46cm long beam that is 3.5x3.5cm square. The beam should fit snugly in the 2 squares we've already made.
- Mark the beam and wind the antenna wire

 You must mark the beam every 3 centimeters. After doing that the 1.5mm2 wire can be stripped. The wire must be stripped since the isolation is not suitable for high frequency uses. It will be very lossy which means your antenna will have much less gain.
When the wire is stripped, it can be wound around the beam, exactly over the markings, in a nice equal spiral.
You must mark the beam every 3 centimeters. After doing that the 1.5mm2 wire can be stripped. The wire must be stripped since the isolation is not suitable for high frequency uses. It will be very lossy which means your antenna will have much less gain.
When the wire is stripped, it can be wound around the beam, exactly over the markings, in a nice equal spiral.
- Solder the antenna wire
This is a critical part.
The BNC connector has some insulation around it's central conductor. You must cut this until it is 1mm above the metal plate.
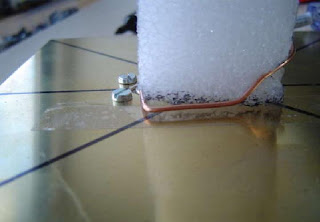
The copper wire must run at a height of 1mm above the plate over a length of 30mm before following the spiral shape. This is very important to tune the antenna's VSWR. A good VSWR basically means that the antenna is capable of 'absorbing' the radio waves coming from the wifi card instead of reflecting them back to the card.
Cutting the isolation of the connector helps you to get the right height when soldering the wire. You can place some tape below the copper wire on the plate to prevent short circuits. Since the wire is quite thick, it easily
retains the shape you put it in. It is very important to cut the 1.5mm wire that is too long at the BNC connector. One side of this wire goes up into the spiral, the part sticking out at the other end must be cut close to the central pin of the connector. Leaving a part here will make the VSWR worse. When the antenna wire is soldered to the connector, we can push the squares down over the beam. This will hold the beam upright. As a last step, the squares are fixed to the plate with some tape.
- Connecting the antenna to your WIFI card
There are multiple ways to connect it to your wlan card.
1. If you have a card with an external antenna, you can cut the wire, and mount a BNC connector to it that you can connect to the antenna.
2. If your wireless card has a connector, you can either buy a cable that fits in your card on one side and has a BNC connector on the other side, or buy a cheap external antenna, cut the wire and mount the connector yourself.
Instructions on how to mount a connector can always be found on the website of the manufacturer. Just make sure you know who made the connector when you buy one. There is one practical tip that is important to know. When soldering a connector, at some point you'll need to solder the center pin. This will always leave some solder on the outside of this pin preventing it from going into the connector housing. You have to 'suck' it away with some solder braid, after that it easily slides in.
When you've got a suitable cable, plug in the connector and give it a test run. You'll notice that you're able to receive much more access point. In my case I got 3 times as many access points. Some people who saw the movie about this antenna on Metacafe made one and they were very enthusiastic about the results.
- Results : 16dBi antenna picks up 21 ap's instead of 7 with the original antenna!
When using this antenna, you should be aware that this antenna has a lot of gain, but because of that, a narrow beam in which it has that gain. In other words, you have to aim it.

The 2 pictures show the number of access points picked up with a normal antenna that comes with the wifi card, and with the 16dBi antenna after scanning it over 180 degrees.

I didn't expect any access points behind me so I didn't scan that, although I can't be sure of that. Anyway, you can see the new antenna picks up 21 access points instead of 7!

Find the center of the plate by drawing lines between the corners and make a mark 20mm from the center. Drill a hole in the plate at that point that is big enough to fit the center conductor and its isolation. After drilling, you can put the connector in the whole, mark the 4 fixing holes, drill them and mount the connector using small bolts.

- Cut the PE or styrofoam

We need to cut 3 pieces of PE foam or styrofoam. PE foam is often used to protect computer or measurement or other sensitive equipment during transport it should be easy to get when asking around if you don't have it yourself. Styrofoam is even easier to get, but a little harder to work on. Styrofoam can be bought at DIY stores as a standard isolation material for houses.

We need to cut two 12x12 centimeter squares that are 3.5cm thick. A 3.5x3.5cm hole must be made in the middle of the squares. We also need to cut a 46cm long beam that is 3.5x3.5cm square. The beam should fit snugly in the 2 squares we've already made.
- Mark the beam and wind the antenna wire


You must mark the beam every 3 centimeters. After doing that the 1.5mm2 wire can be stripped. The wire must be stripped since the isolation is not suitable for high frequency uses. It will be very lossy which means your antenna will have much less gain.
When the wire is stripped, it can be wound around the beam, exactly over the markings, in a nice equal spiral.
- Solder the antenna wire
This is a critical part.
The BNC connector has some insulation around it's central conductor. You must cut this until it is 1mm above the metal plate.

The copper wire must run at a height of 1mm above the plate over a length of 30mm before following the spiral shape. This is very important to tune the antenna's VSWR. A good VSWR basically means that the antenna is capable of 'absorbing' the radio waves coming from the wifi card instead of reflecting them back to the card.

Cutting the isolation of the connector helps you to get the right height when soldering the wire. You can place some tape below the copper wire on the plate to prevent short circuits. Since the wire is quite thick, it easily
retains the shape you put it in. It is very important to cut the 1.5mm wire that is too long at the BNC connector. One side of this wire goes up into the spiral, the part sticking out at the other end must be cut close to the central pin of the connector. Leaving a part here will make the VSWR worse. When the antenna wire is soldered to the connector, we can push the squares down over the beam. This will hold the beam upright. As a last step, the squares are fixed to the plate with some tape.
- Connecting the antenna to your WIFI card
There are multiple ways to connect it to your wlan card.

1. If you have a card with an external antenna, you can cut the wire, and mount a BNC connector to it that you can connect to the antenna.
2. If your wireless card has a connector, you can either buy a cable that fits in your card on one side and has a BNC connector on the other side, or buy a cheap external antenna, cut the wire and mount the connector yourself.
Instructions on how to mount a connector can always be found on the website of the manufacturer. Just make sure you know who made the connector when you buy one. There is one practical tip that is important to know. When soldering a connector, at some point you'll need to solder the center pin. This will always leave some solder on the outside of this pin preventing it from going into the connector housing. You have to 'suck' it away with some solder braid, after that it easily slides in.
When you've got a suitable cable, plug in the connector and give it a test run. You'll notice that you're able to receive much more access point. In my case I got 3 times as many access points. Some people who saw the movie about this antenna on Metacafe made one and they were very enthusiastic about the results.
- Results : 16dBi antenna picks up 21 ap's instead of 7 with the original antenna!
When using this antenna, you should be aware that this antenna has a lot of gain, but because of that, a narrow beam in which it has that gain. In other words, you have to aim it.

The 2 pictures show the number of access points picked up with a normal antenna that comes with the wifi card, and with the 16dBi antenna after scanning it over 180 degrees.

I didn't expect any access points behind me so I didn't scan that, although I can't be sure of that. Anyway, you can see the new antenna picks up 21 access points instead of 7!
Tuesday, July 31, 2012
16 SANSKAAR EVERY HINDU SHOULD FOLLOW
16 SANSKAAR EVERY HINDU SHOULD FOLLOW
Hindu scriptures describe many rites to be performed during the many important phases of life. The rites, of which 16 are the most significant, hold both a scientific as well as a pious meaning:
(1) Garbhaadaan - at the time of conception; the couple is righteously guided, and the child prepares for a spiritual life.
(2) Punsavan - when the fetus completes its first trimester; emphasizing the physical, mental, and spiritual health of the child and mother.
(3) Simintonnayan - approximately when the fetus completes the second trimester.
(4) Jatakarma - the birth of the child.
(5) Namakaran - custom of naming the newborn child.
(6) Nishkraman - when the child first leaves the home to get the blessings of saints or to visit a temple.
(7) Annaprasan - at around six months, when the child starts eating food and teething.
(8) Chudkarma (or mundan) - at around the first to third year, the child's hair is cut for the first time.
(9) Karnavedh - piercing of the child's ears (this and other customs are performed according to different family traditions).
(10) Upanayan - when the child is ready to begin his spiritual studies with a guru; brahmin also bear a sacred thread.
(11) Vedarambha - the commencement of spiritual studies (e.g., at a Gurukul).
(12) Samavartan - at the end of studies, with the guru's blessings the person is ready to enter the life of a householder.
(13) Vivaah - or marriage; many customs guide the occasion that carry a person from the brahmchaari aashram (celibate phase in life) to the gruhasth aashram (married phase).
(14) Vanaprashta - literally, entering the forest, commencing the 3rd phase of life when one begins to detach from the family and focus on God.
(15) Sanyaas - entering the fourth phase of total devotion to God.
(16) Antyeshti - the rites when a person passes away.
Developing a Fundraising Strategy
What is a fundraising strategy?
A fundraising strategy is a plan that sets out the funding need for an organisation, project or event, alongside the identified actions, timescales and possible funding resources to meet this need.
Why develop a fundraising strategy?
It is commonly recognised that better planning helps to avoid wasted time and resources. The development of a fundraising strategy should enable the people in an organisation to ensure that:
- there is a shared understanding of the aims and priorities for the organisation
- the agreed priorities are a ‘good fit’ with what the organisation is set up to do
- the agreed priorities are complementary to other local activities and services and
- don’t duplicate those that are being undertaken by other organisations
- there is a shared strategy that sets out how those priorities are going to be realised
This is increasingly important at a time when there is uncertainty about funding; a well developed fundraising strategy will help to:
- provide clarity about the organisation’s aims / priorities
- ensure that the priorities are realistic and achievable
- ensure better targeting of funders
- ensure the highest possibility of funding success
- encourage a shared responsibility for fundraising
What happens with a fundraising strategy?
A completed fundraising strategy can be used as a stand-alone document for a once-off
project, or as an appendix to an existing strategic / business plan. A fundraising strategy is
not a substitute for a business plan. A completed fundraising strategy is the first step of the
process, the most effective strategy will be reviewed to take into account changes within
and outside the organisation and to assess and measure progress.
Some ways to integrate a fundraising strategy into an organisation might include:
- regularly review the strategy
- build strategy up‐dates into meetings
- identify key milestones for the plan to measure progress
- circulate the plan to new committee members
What resources are needed to develop a fundraising strategy?
- People - Commitee members/Staff
- Time (Dependent on the number of sections completed) – some sessions could be a replacement committee meeting and others might need longer to complete – try to plan a timetable for completion before the process begins
- Commitment to the process
- A nominated person/s to guide the group through the exercises or an external facilitator
- A nominated person/s to collate the section write ups and finalise the plan which will form the basis of the strategy
- Relevant documentation i.e. constitution, strategic / business plan
- The guide will only be as useful as the information which is put into it
NO SHUTDOWN!!!
Wanna play with your friends by removing the shutdown option from start menu in their computer.
Just hack it down!!!
Open the regedit, by opening RUN and then type in regedit.
Locate for HKEY_CURRENT_USER_\Software\Microsoft\Windows\Current Version\Explorer
"NoClose"="DWORD:1"
Press ok and then restart the computer to have fun...
Please follow my blog and comment...
Monday, July 30, 2012
RupeeTech: Hack your windows XP to a new Start ButtonNow in...
RupeeTech: Hack your windows XP to a new Start Button
Now in...: Hack your windows XP to a new Start Button Now in order to change to text on your start menu from "START" to any thing you want, here is ...
Now in...: Hack your windows XP to a new Start Button Now in order to change to text on your start menu from "START" to any thing you want, here is ...
Hack your windows XP to a new Start Button
Now in order to change to text on your start menu from "START" to any thing you want, here is an very easy and cool tutorial.
In order to make the change we need to pen the explorer.exe file found in c:\windows\explorer . Make a backup copy of explorer.exe to explorer_backup.exe.
If any thing goes wrong you'll always be able to restore your backup and get back to the way it was before the hack.
Open the resource hacker and select the explorer.exe file.
Once you have opened explorer in Resource Hacker you will notice a menu appears on the left side of the program with a lots of different expandable menus columns. The category we are going to use is String Table.
- Double-click String Table which will show several numbers
- Double String 37 to expand it
- (IF you are using the Classic Layout rather than the XP layout, use number 98 instead.)
- Click 1033
- Double-click the start text in the right column.
- The text start should be highlighted and the surrounding quotes should not.
- Now type the new text you want in your start button. It cannot be more than 10 characters in length and must be surrounded by those quotes.
- Once you edit the text, the Compile Script button will become enabled. Click the Compile Script button.
- Click FILE-> Save As and save you new file as explorer.exe in the windows directory.
HACKING THE REGISTRY
Now we need to tell the OS to use our new hacked explorer file.
1. Click Start -> Run -> type in regedit and ENTER.
2. Navigate to the following key:
HKEY_LOCAL_MACHINE\SOFTWARE\Microsoft\Windows NT\CurrentVersion\Winlogon
3. Double click on the registry entry named Shell and change the value from explorer.exe to explorerhack.exe
4. Click OK to close the registry editor/
LOG OFF the user and log back in ENJOY you newly hacked START BUTTON with your text in it :)
Please Comment below for any queries and links
7 Ways To Create Your Own Apps
You can create free apps without having any knowledge of programming with the tools available on the following sites and can place it on market for making some extra funds...
1. appsbar.com - Android
2. buzztouch.com - Android & iOS
3. andromo.com - Android
4. monk.ee
5. appmakr.com - Android, iOS & Windows
6. appinventor.mit.edu
7. ibuildapp.com - Android & iOS
Phases Of Website Development
1. Information Gathering
- Purpose - What do you want to provide.
- Goals
- Target Audience
- Content
2. Planning
- Purpose
- Goals
- Target Audience
- Content
3. Structure
4. Design
5. Development
6. Testing & Delivering
Need to be Planned Before Starting a Project
- A Good Topic
- An Attractive Name
- No of Pages
- Content
- Outline of the Website
- Branding
- USP - Unique Selling Proposition
- SWOT - Strength, Weakness, Opportunities & Threats
- Pert Chart (Flow Chart)
Subscribe to:
Comments
(
Atom
)