Monday, November 19, 2012
Tuesday, November 13, 2012
RENAME YOUR RECYCLE BIN
RENAME YOUR RECYCLE BIN
 Ever wanted to change it..?
With the help of this trick you can rename your recycle bin.
Just follow the steps given below:
Don't You feel Bore with the same old name of Recycle Bin..?
Step 1. Go to Start > Run
Step 2. Type in regedit this will open Registry Editor.
Step 3. Go to HKEY_CLASSES_ROOT/CLSID/{645FF040-5081-101B-9F08-00AA002F954E}.
Step 4. Change "Recycle Bin" to whatever you want.
( You can change it to any interesting name like my pc trash, dump zone, the wastebox or any other funny one.)
Blank Comment in Facebook!!!
How to add a Blank Comment in Facebook!!!
Hey Guys! In This Post I am Going to tell you how to post a blank Facebook status or How to Post an Empty Status on Facebook Wall.
It works only With both Status and Comments.
So here is the trick..
1) Goto Your Profile and type
2) Type either “@[0:0: ]” or “alt+0173? (of numpad without qoutes)
3) Press Enter… And You Are Done..:P
Simple, isn’t it..
Now play around , shock your friends and have fun..;-)
Subscribe to get more trick and hacksBug In Windows Calculator
Windows Hacks: Bug In Windows Calculator
Here is a easy trick to find out a bug in windows calculator.
Step 1: Go to run, type calc and click ok.
Step 2: Then, Type 9, Take Square Root of it.
You should get the answer 3
Step 3: Now, Subtract the answer (which is 3) by 3.
Instead of getting 0 as the answer you get a long number.
Now that's the bug, that's for all nos, For all version of Windows
Ccheck out! and start following for new tricks and hacks
Monday, November 12, 2012
How To Make a 10$ WIFI 16dBi Super Antenna
How To Make a 10$ WIFI 16dBi Super Antenna
- Materials Needed
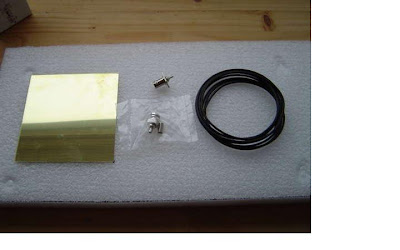
A 12x12cm brass, copper or tinned metal plate, a BNC chassis connector, a BNC cable connector, 35mm thick PE or styrofoam (can also be thicker) and some 1.5mm2 single core wire. This stuff is used in the Netherlands in 220V in house cabling.
- Other possible materials:
I can imagine that people want to use other materials, like a pipe to mount the antenna wire on. If you could get a pipe with roughly a 35mm diameter, you can use that IF the material is good for radio waves. There is a very simple way to find out. Place a piece of styrofoam in your microwave, together with a piece of the material you want to use. Turn on the microwave for 30 seconds. Stop the microwave immediately if you see the other material melt. Now check out how warm the other material is, if it's not warmer, or a little warmer than the styrofoam, you have found suitable material, if it has melted or is very hot,that you're dealing with lossy material which absorbes microwave radiation and turns it into heat, this material is useless for making high performance antenna's. This trick works so well because the WIFI band is at 2.45GHz and microwaves also radiate at that frequency, so it's a perfect test. Some very good materials are PE tubes, Teflon tubes (if you can afford them) and Polypropylene tubes.
- Mount the BNC connector to the plate
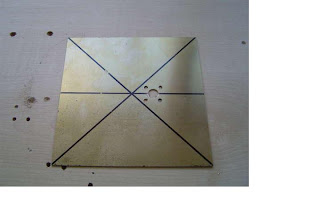
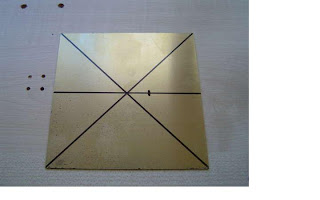
Find the center of the plate by drawing lines between the corners and make a mark 20mm from the center. Drill a hole in the plate at that point that is big enough to fit the center conductor and its isolation. After drilling, you can put the connector in the whole, mark the 4 fixing holes, drill them and mount the connector using small bolts.
- Cut the PE or styrofoam
We need to cut 3 pieces of PE foam or styrofoam. PE foam is often used to protect computer or measurement or other sensitive equipment during transport it should be easy to get when asking around if you don't have it yourself. Styrofoam is even easier to get, but a little harder to work on. Styrofoam can be bought at DIY stores as a standard isolation material for houses.
We need to cut two 12x12 centimeter squares that are 3.5cm thick. A 3.5x3.5cm hole must be made in the middle of the squares. We also need to cut a 46cm long beam that is 3.5x3.5cm square. The beam should fit snugly in the 2 squares we've already made.
- Mark the beam and wind the antenna wire
You must mark the beam every 3 centimeters. After doing that the 1.5mm2 wire can be stripped. The wire must be stripped since the isolation is not suitable for high frequency uses. It will be very lossy which means your antenna will have much less gain.
When the wire is stripped, it can be wound around the beam, exactly over the markings, in a nice equal spiral.
- Solder the antenna wire
This is a critical part.
The BNC connector has some insulation around it's central conductor. You must cut this until it is 1mm above the metal plate.
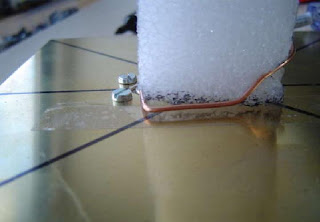
The copper wire must run at a height of 1mm above the plate over a length of 30mm before following the spiral shape. This is very important to tune the antenna's VSWR. A good VSWR basically means that the antenna is capable of 'absorbing' the radio waves coming from the wifi card instead of reflecting them back to the card.
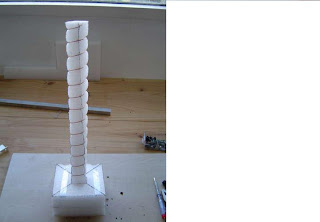
Cutting the isolation of the connector helps you to get the right height when soldering the wire. You can place some tape below the copper wire on the plate to prevent short circuits. Since the wire is quite thick, it easily
retains the shape you put it in. It is very important to cut the 1.5mm wire that is too long at the BNC connector. One side of this wire goes up into the spiral, the part sticking out at the other end must be cut close to the central pin of the connector. Leaving a part here will make the VSWR worse. When the antenna wire is soldered to the connector, we can push the squares down over the beam. This will hold the beam upright. As a last step, the squares are fixed to the plate with some tape.
- Connecting the antenna to your WIFI card
There are multiple ways to connect it to your wlan card.
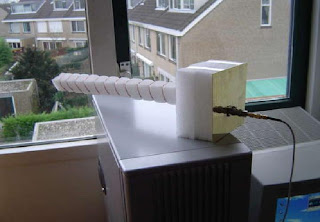
1. If you have a card with an external antenna, you can cut the wire, and mount a BNC connector to it that you can connect to the antenna.
2. If your wireless card has a connector, you can either buy a cable that fits in your card on one side and has a BNC connector on the other side, or buy a cheap external antenna, cut the wire and mount the connector yourself.
Instructions on how to mount a connector can always be found on the website of the manufacturer. Just make sure you know who made the connector when you buy one. There is one practical tip that is important to know. When soldering a connector, at some point you'll need to solder the center pin. This will always leave some solder on the outside of this pin preventing it from going into the connector housing. You have to 'suck' it away with some solder braid, after that it easily slides in.
When you've got a suitable cable, plug in the connector and give it a test run. You'll notice that you're able to receive much more access point. In my case I got 3 times as many access points. Some people who saw the movie about this antenna on Metacafe made one and they were very enthusiastic about the results.
- Results : 16dBi antenna picks up 21 ap's instead of 7 with the original antenna!
When using this antenna, you should be aware that this antenna has a lot of gain, but because of that, a narrow beam in which it has that gain. In other words, you have to aim it.
The 2 pictures show the number of access points picked up with a normal antenna that comes with the wifi card, and with the 16dBi antenna after scanning it over 180 degrees.
I didn't expect any access points behind me so I didn't scan that, although I can't be sure of that. Anyway, you can see the new antenna picks up 21 access points instead of 7!

Find the center of the plate by drawing lines between the corners and make a mark 20mm from the center. Drill a hole in the plate at that point that is big enough to fit the center conductor and its isolation. After drilling, you can put the connector in the whole, mark the 4 fixing holes, drill them and mount the connector using small bolts.
- Cut the PE or styrofoam
We need to cut 3 pieces of PE foam or styrofoam. PE foam is often used to protect computer or measurement or other sensitive equipment during transport it should be easy to get when asking around if you don't have it yourself. Styrofoam is even easier to get, but a little harder to work on. Styrofoam can be bought at DIY stores as a standard isolation material for houses.
We need to cut two 12x12 centimeter squares that are 3.5cm thick. A 3.5x3.5cm hole must be made in the middle of the squares. We also need to cut a 46cm long beam that is 3.5x3.5cm square. The beam should fit snugly in the 2 squares we've already made.
- Mark the beam and wind the antenna wire
You must mark the beam every 3 centimeters. After doing that the 1.5mm2 wire can be stripped. The wire must be stripped since the isolation is not suitable for high frequency uses. It will be very lossy which means your antenna will have much less gain.
When the wire is stripped, it can be wound around the beam, exactly over the markings, in a nice equal spiral.
- Solder the antenna wire
This is a critical part.
The BNC connector has some insulation around it's central conductor. You must cut this until it is 1mm above the metal plate.

The copper wire must run at a height of 1mm above the plate over a length of 30mm before following the spiral shape. This is very important to tune the antenna's VSWR. A good VSWR basically means that the antenna is capable of 'absorbing' the radio waves coming from the wifi card instead of reflecting them back to the card.

Cutting the isolation of the connector helps you to get the right height when soldering the wire. You can place some tape below the copper wire on the plate to prevent short circuits. Since the wire is quite thick, it easily
retains the shape you put it in. It is very important to cut the 1.5mm wire that is too long at the BNC connector. One side of this wire goes up into the spiral, the part sticking out at the other end must be cut close to the central pin of the connector. Leaving a part here will make the VSWR worse. When the antenna wire is soldered to the connector, we can push the squares down over the beam. This will hold the beam upright. As a last step, the squares are fixed to the plate with some tape.
- Connecting the antenna to your WIFI card
There are multiple ways to connect it to your wlan card.

1. If you have a card with an external antenna, you can cut the wire, and mount a BNC connector to it that you can connect to the antenna.
2. If your wireless card has a connector, you can either buy a cable that fits in your card on one side and has a BNC connector on the other side, or buy a cheap external antenna, cut the wire and mount the connector yourself.
Instructions on how to mount a connector can always be found on the website of the manufacturer. Just make sure you know who made the connector when you buy one. There is one practical tip that is important to know. When soldering a connector, at some point you'll need to solder the center pin. This will always leave some solder on the outside of this pin preventing it from going into the connector housing. You have to 'suck' it away with some solder braid, after that it easily slides in.
When you've got a suitable cable, plug in the connector and give it a test run. You'll notice that you're able to receive much more access point. In my case I got 3 times as many access points. Some people who saw the movie about this antenna on Metacafe made one and they were very enthusiastic about the results.
- Results : 16dBi antenna picks up 21 ap's instead of 7 with the original antenna!
When using this antenna, you should be aware that this antenna has a lot of gain, but because of that, a narrow beam in which it has that gain. In other words, you have to aim it.
The 2 pictures show the number of access points picked up with a normal antenna that comes with the wifi card, and with the 16dBi antenna after scanning it over 180 degrees.
I didn't expect any access points behind me so I didn't scan that, although I can't be sure of that. Anyway, you can see the new antenna picks up 21 access points instead of 7!
Labels:
Hacking
,
How to make a Wifi
Subscribe to:
Comments
(
Atom
)


